

Why Your Vibe Coded App Emails Go to Spam
Stop losing users to the spam folder. This vibe-coder-friendly guide shows you how to set up email authentication (SPF, DKIM, DMARC) for your Replit app in 15 minutes. No technical knowledge required, just copy DNS records from your email service.
This is the One Thing Replit Agent Can't Fix Without You
The Problem:
You built an amazing app in Replit. The authentication works perfectly. Password resets work. Email verification works. Everything functions exactly as designed.
But...
Every single email your app sends goes straight to the spam folder. Your users never see their verification emails. Password resets get lost. Welcome emails disappear. Your app looks broken even though it's not.
Why? Because you're missing email authentication (DMARC, DKIM, and SPF). And Replit Agent can't fix this for you, you have to do it yourself.
What You'll Learn
Why your emails go to spam (even when everything works)
What DMARC, DKIM, and SPF actually mean (in plain English)
How to check if you have email authentication set up
Step-by-step guide to fixing it
How to verify your emails will reach the inbox
The Harsh Reality of Email Delivery
Here's what happens when you build an app with Replit or any other vibe-coding tool and add email features:
You: "Add user registration with email verification"
Replit Agent: [Builds registration system, integrates Resend/SendGrid/Mailgun, sends verification emails]
You: "Perfect! Let me test it..."
[You register with your Gmail account]
Your inbox: [Empty]
Your spam folder: "Please verify your email address"
You: "Why is this in spam?!"
This happens to 99.99% of vibe coders. And it's not the Vibe-Coding platform’s fault. It's not Resend (or similar) fault. It's not even your fault for not knowing.
The problem? You're sending emails from a domain (like resend.com, sendgrid.net, or mailgun.org) that you don't own, without proper authentication.
Email providers like Gmail, Outlook, and Yahoo see this as suspicious. They assume you're a spammer. Straight to junk.
Why This Happens
The Email Authentication Problem Explained Simply
Imagine you get a letter in the mail that says:
Return Address: The White House, Washington DC
Message: "Dear Citizen K, please send $500 to this address..."
Would you trust it? Of course not! Anyone can write "The White House" on an envelope.
That's exactly what happens with emails. Your app says "This email is from support@yourapp.com" but there's no proof that you actually own yourapp.com or that you're authorized to send emails from it.
Email authentication (SPF, DKIM, DMARC) is the digital equivalent of:
A government-issued ID proving you are who you say you are
An official stamp proving the letter wasn't tampered with
A written policy explaining what to do with suspicious mail
Without these, Gmail/Outlook/Yahoo (and other mailbox providers) treat your emails like a suspicious letter with no proof of origin.
The Three Email Authentication Methods
Don't panic! You don't need to memorize these. You just need to set them up once. Think of them as three digital ID cards that prove your emails are legit:
1. SPF (Sender Policy Framework)
What it does: Creates a list of servers/services allowed to send emails on behalf of your domain.
Plain English: "These are the only mail carriers authorized to deliver mail with my return address on it."
Example SPF Record:
v=spf1 include:resend.com ~all
Translation: "Resend is allowed to send emails from my domain. If an email claims to be from my domain but doesn't come from Resend, it's probably spam."
2. DKIM (DomainKeys Identified Mail)
What it does: Adds a digital signature to your emails proving they haven't been tampered with.
Plain English: "This letter has an official wax seal. If the seal is broken, someone messed with the letter."
How it works:
Your email service (Resend, SendGrid, Mailgun, etc.) signs each email with a private key
You publish the public key in your DNS records
Gmail/Outlook checks the signature using your public key
If it matches, the email is authentic and unmodified
DMARC (Domain-based Message Authentication, Reporting & Conformance)
What it does: Tells email providers what to do if SPF or DKIM fails.
Plain English: "If someone sends a letter with my return address but it's not authenticated, here's what I want you to do with it."
Example DMARC Record:
v=DMARC1; p=quarantine; rua=mailto:dmarc@your_email.com
Translation: "If an email fails authentication, put it in the spam folder. Also, send me reports about failed emails so I can investigate."
Policy Options:
p=none - Do nothing (just monitor and report)
p=quarantine - Send to spam if authentication fails
p=reject - Reject the email completely if authentication fails
How to Check If You Have Email Authentication
Before fixing anything, let's see if you already have it set up:
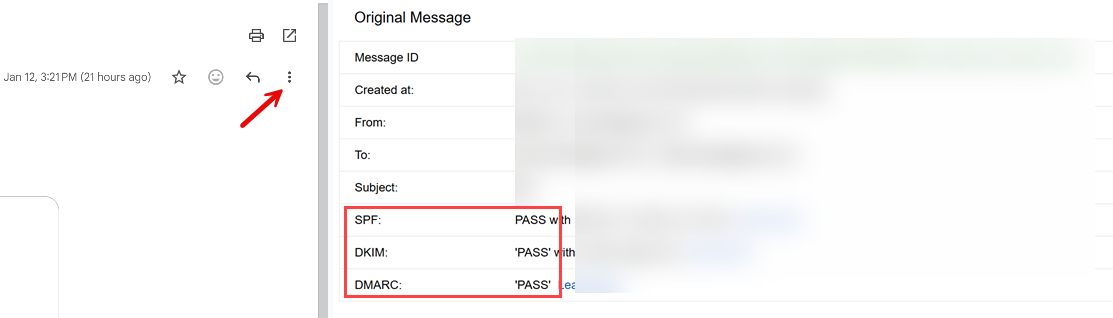
Method 1: Send a Test Email and Check Headers
Step 1: Send a test email from your app to your Gmail account.
Step 2: Open the email in Gmail
Step 3: Click the three dots (⋮) then "Show original"
Step 4: Look for these lines:
SPF: PASS
DKIM: PASS
DMARC: PASS
If you see "FAIL" or "NONE" for any of these, You need to fix it if you’re sending emails from that domain!
IMPORTANT - don’t use “test” in the subject. Instead, draft your test email with a meaningful subject and content to avoid AI content filtering, which could still place you in the SPAM folder.
Method 2: Use an Online Tool
Quick Check Tools:
MXToolbox: mxtoolbox.com/SuperTool.aspx
DMARCIAN Domain Checker: https://dmarcian.com/domain-checker/ (one of my go-tos)
Google Admin Toolbox: toolbox.googleapps.com/apps/checkmx/
EasyDMARC: https://easydmarc.com/tools/dmarc-lookup (one of my go-tos)
Mail-Tester: mail-tester.com
How to use Mail-Tester:
Go to mail-tester.com
Copy the test email address they give you
Send an email from your app to that address (make sure the email does not contain any PII (Personally Identifiable Information) or secrets
Check your score (aim for 10/10)
Review what's failing (SPF, DKIM, DMARC)
If you send from Outlook, you may see an orange warning regarding policy state, you can ignore those.
How to Fix Email Authentication
Before You Start:
You'll need:
A domain you own (yourapp.com, etc.) - If you don't have one, get one from GoDaddy or Replit for ~$10/year
Access to your domain's DNS settings (through Cloudflare, GoDaddy, Replit etc.)
An account with an email service (Resend, SendGrid, Mailgun, or AWS SES)
The fix depends on which email service you're using. Click yours below:
Option 1: Using Resend (Easiest for Beginners imho)
Prerequisites:
You own a domain (yourapp.com etc.)
You have access to your domain's DNS settings
You have a Resend account (free at resend.com)
Step-by-Step:
1. Add Your Domain in Resend:
Login to resend.com
Click Add Domain
Enter your domain (e.g., yourapp.com)…I like my transaction emails, coming from the app, to have dispatch.yourapp.com in the FROM.
Click Add
2. Resend Shows You DNS Records to Add:
You'll see records like this:
SPF Record (TXT):
Type: TXT
Name: send.dispatch (or whatever subdomain Resend shows)
Value: v=spf1 include:amazonses.com ~all
MX Record (for bounce handling):
Type: MX
Name: send.dispatch (or whatever subdomain Resend shows)
Value: feedback-smtp.us-east-1.amazonses.com
Priority: 10
DKIM Records (CNAME - usually 3 records):
Resend will show you 3 CNAME records with cryptographic values
They look like: xxxxx._domainkey.send.dispatch.yourapp.com
Copy each one exactly as shown
Note: Resend uses AWS SES infrastructure, so your records will reference amazonses.com
3. Add Records to Your DNS Provider:
If you purchased the domain from Replit, go to Publishing > Domains and enter the values you copied from Resend.
Important Note: Resend typically uses a subdomain like send.dispatch.yourapp.com for sending. This means your emails will come from support@send.dispatch.yourapp.com. This is normal and actually recommended for transactional emails!
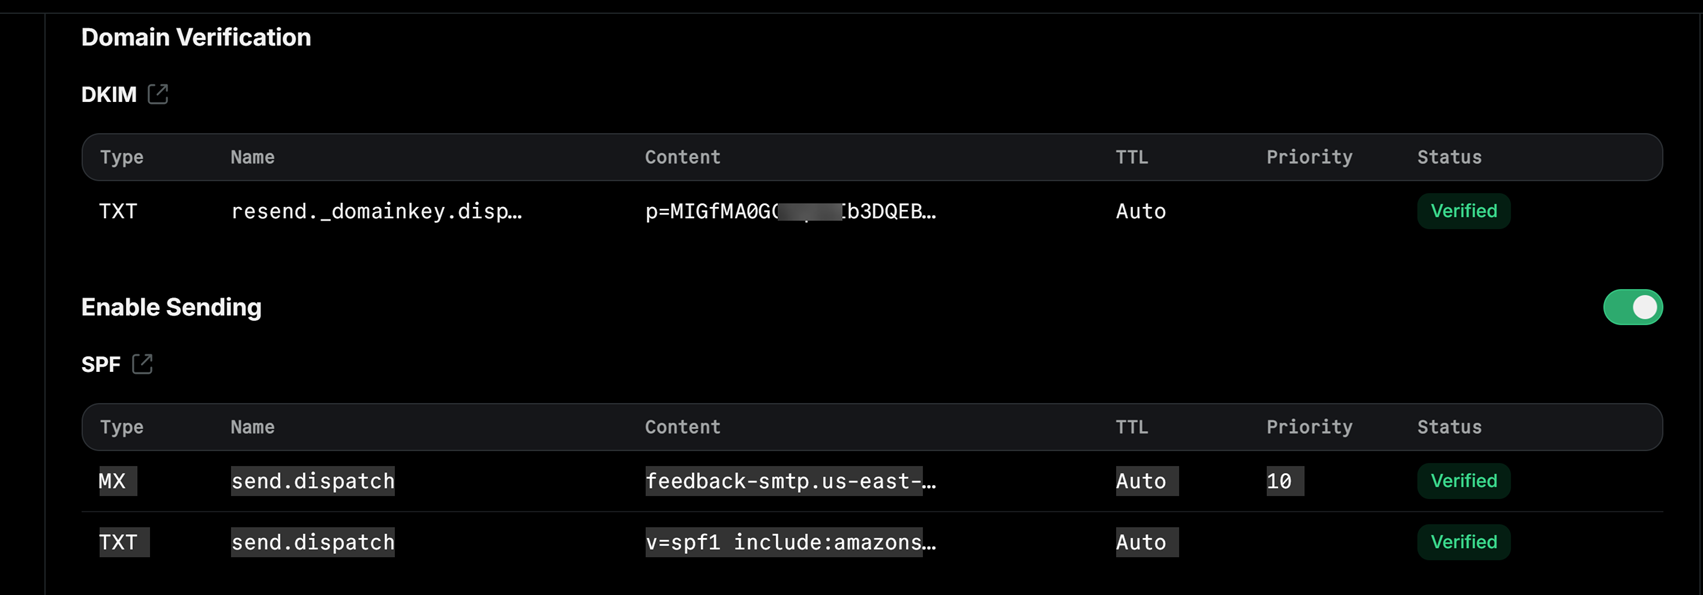
This is what it should look like in Resend

This is what it should look like in Replit > Publishing > Domains
If using GoDaddy:
Login to GoDaddy
Go to My Products > Domains
Click DNS next to your domain
Click Add for each record type
Enter records exactly as Resend shows
Save
4. Verify in Resend:
Go back to Resend Domains
Click Verify Records
Wait 5-10 minutes (DNS can be slow)
Click Verify again
Once verified, you'll see green checkmarks
VERY IMPORTANT: There will be times where you will want to send marketing and business emails from your Outlook using the same domain. In such cases, you have to also copy over the SFP and DKIM records. If you’re using GoDaddy, they will provide the records after setting up the Outlook account. Get the Outlook DKIM from the Microsoft 365 Defender portal. Sign in with with an admin account and navigate to Email & collaboration > Policies & rules > Threat policies > Email authentication and get your DKIM from there.
As for DMARC, if one is not present in your DNS, add it: _dmarc v=DMARC1; p=none; sp=reject; pct=100;
Start with p=none to monitor, then switch to p=quarantine after testing.
This is what an app DNS records should look like in Replit (in this case, it’s also using Resend for trax emails and GoDaddy for Outlook)
TXT _dmarc v=DMARC1; p=reject; sp=reject; pct=100;
TXT @ MS=ms87677777…this one proves ownership for Microsoft services…in this case Im using Outlook
TXT @ v=spf1 include:secureserver.net -all
CNAME autodiscoverautodiscover.outlook.com
CNAME emailemail.secureserver.net
MX @ myapp-com.mail.protection.outlook.com
MX send.dispatchfeedback-smtp.us-east-1.amazonses.com
TXT send.dispatchv=spf1 include:amazonses.com~all
TXT resend._domainkey.dispatchp=MIGfMA0GCSqGSIb3DQEBAQUAA4GNAD…
CNAME selector1._domainkeyselector1-myapp-com._domainkey.netorg19830.w-v1.dkim.mail.microsoft
CNAME selector2._domainkeyselector2-myapp-com._domainkey.netorg19830.w-v1.dkim.mail.microsoft
Test Your Emails:
Send a test email from your app
Check that it arrives in inbox (not spam!)
Open the email > Click ⋮ > "Show original"
Verify: SPF: PASS, DKIM: PASS, DMARC: PASS
Option 2: Using SendGrid
Step-by-Step:
1. Domain Authentication in SendGrid:
Login to SendGrid
Go to Settings > Sender Authentication
Click Authenticate Your Domain
Enter your domain (e.g., yourapp.com)
Choose your DNS host (Cloudflare, GoDaddy, etc.)
Click Next
2. SendGrid gives you DNS records to add:
You'll see something like this:
CNAME Records (for DKIM):
s1._domainkey.yourapp.com → s1.domainkey.u123456.wl.sendgrid.net
s2._domainkey.yourapp.com → s2.domainkey.u123456.wl.sendgrid.net
TXT Record (for SPF - might already exist):
yourapp.com → v=spf1 include:sendgrid.net ~all
3. Add these records to your DNS provider:
If using Cloudflare (at the time of writing this, CF is easier to config if the domain was purchased outside of Replit) :
Login to Cloudflare
Select your domain
Go to DNS > Records
Click Add record
Type: CNAME
Name:
s1._domainkeyTarget:
s1.domainkey.u123456.wl.sendgrid.net(from SendGrid)Proxy status: DNS only (gray cloud)
Click Save
Repeat for
s2._domainkey
If using GoDaddy:
Login to your registrar
Find DNS settings for your domain
Add the CNAME records exactly as SendGrid shows
Save changes
4. Verify in SendGrid:
Go back to SendGrid
Click Verify
Wait 24-48 hours for DNS to propagate (usually much faster)
Click Verify again
Once verified, you'll see green checkmarks
5. Set up DMARC:
Add a TXT record in your DNS:
Type: TXT
Name: _dmarc
Value: v=DMARC1; p=none; rua=mailto:dmarc@yourapp.com
Start with p=none to monitor, then switch to p=quarantine after testing.
Testing Your Email Authentication
Test 1: Send Email to Gmail
Send a test email from your app to your Gmail
Check if it lands in inbox (not spam!)
Open the email
Click ⋮ > "Show original"
Verify all three pass:
SPF: PASS
DKIM: PASS
DMARC: PASS
Test 2: Use Mail-Tester (and the tools I listed at the top)
Go to mail-tester.com
Copy the test email address
Send from your app to that address….type a well formatted email with proper content and not SUBJECT: “test”, BODY “test” No PII details!!!!
Check your score
Goal: 10/10 or at least 9/10
Common issues if score is low:
SPF not set up → Add SPF record
DKIM not set up → Add DKIM records
DMARC missing → Add DMARC record
Blacklisted IP → Contact your email service
Missing unsubscribe link → Add to your emails
Test 3: Send to Multiple Email Providers
Test with accounts on:
Gmail
Outlook
Yahoo
Proton (for the techies)
Your company email (if using corporate email)
All should land in inbox, not spam!…in some cases Gmail may land you in spam the first week, until your IP gains reputation. Keep sending formatted emails to Gmail accounts.
Common Issues & Solutions
Issue #1: DNS Records Not Verifying
Symptoms: Added records but SendGrid/Mailgun says "Not verified"
Solution:
Wait 24-48 hours for DNS propagation
Double-check you entered records exactly as shown (no typos)
Make sure you added records to the RIGHT domain (not a subdomain)
If using Cloudflare, set CNAME records to "DNS only" (not proxied)
Issue #2: Emails Still Going to Spam
Symptoms: SPF/DKIM/DMARC all pass but emails still in spam
Solution:
Check your email content (avoid spam trigger words: "free", "click here", excessive caps)…well formatted email content.
Make sure you're not sending too many emails too quickly (rate limiting)
Add an unsubscribe link if they’re not transactional emails (required by Gmail)
Verify your IP isn't blacklisted (check with MXToolbox)
Build sender reputation slowly (start with small volumes)
Issue #3: SPF Includes Multiple Services
Symptoms: You use SendGrid AND another service, SPF record conflicts
Solution:
Combine them in one SPF record:
v=spf1 include:sendgrid.net include:_spf.google.com ~all
Note: SPF has a limit of 10 DNS lookups. Use SPF flattening tools if you exceed this.
Issue #4: DMARC Reports Showing Failures
Symptoms: Getting DMARC reports with failed authentication
Solution:
Review which emails are failing (might be forwarded emails)
Check if you have multiple services sending emails (all need authentication)
Verify SPF and DKIM are correctly set up
Start with
p=noneto monitor before enforcing
Email Authentication Deployment Checklist
Use this checklist before deploying your app to ensure emails land in inbox, not spam.
Domain Setup
- Own a domain
- Have access to DNS settings
- Domain verified in email service (e.g. Resend/SendGrid/Mailgun/AWS SES)
SPF Configuration
- SPF TXT record added to DNS
- Includes your email service (e.g.
include:secureservernet.com,include:amazonsesnet.com, etc.) - SPF record verified in email service dashboard
DKIM Configuration
- DKIM CNAME records added to DNS (usually 2-3 records)
- DKIM verified in email service dashboard
- Green checkmarks showing in email service
DMARC Configuration
- DMARC TXT record added to DNS (_dmarc subdomain)
- Policy set (start with p=none, move to p=quarantine then p=reject)
- Reporting email configured (rua=mailto:...)...this is for reporting, e.g. services like ValiMail. Add your email address if you want to receive the reporting
Testing
- Test email sent to Gmail. Lands in inbox
- Email headers show SPF: PASS, DKIM: PASS, DMARC: PASS
- Mail-Tester score: 9/10 or 10/10
- Tested with multiple email providers (Gmail, Outlook, Yahoo)
- No emails going to spam
App Configuration
- App sends from authenticated domain (support@yourapp.com and/or support@dispatch.yourapp.com)
- Reply-to email set correctly
- Proper email headers included
- Unsubscribe link added (for marketing emails)
Before deploying, verify ALL boxes are checked!
Wrapping Up
Email authentication (SPF, DKIM, DMARC) sounds intimidating, but it's really just a few steps and a max 24 hours wait for global DNS propagation.
This is the ONE thing Replit Agent (or other Vibe-Coding apps) can't do for you at this time. But it's also one of the easiest things to fix once you know the steps.
The result? Your app's emails actually reach your users. Password resets work. Email verifications arrive. Welcome emails land in the inbox. Marketing emails reach INBOXES, and your app looks professional.

Webhooks Explained for Vibe Coders
Don't deploy webhooks without asking these questions first. This beginner-friendly guide walks vibe coders through 15 critical questions to ask Replit Agent about webhook security, reliability, data handling, timing, and testing. Learn how to verify signatures, handle duplicates, respond quickly, and test locally, all explained without technical jargon. Perfect for anyone building payment systems, notification services, or apps that receive real-time events. Complete with deployment checklist and real examples.
The Questions You Need to Ask Your Replit Agent Before Deploying
Who This Guide Is For:
You're building an app in Replit (or other Vibe Coding tools). You need to receive notifications from other services (like Stripe for payments, Twilio for texts, or Mailchimp for email events). You've heard the word "webhook" but you're not exactly sure what it means or how to make sure yours work correctly.
This guide is for you, the vibe coder who wants to build real apps without getting a computer science degree first.
What the Heck is a Webhook?
Simple explanation: A webhook is like a doorbell for your app. When something important happens on another service, they ring your doorbell (send a message to your app) to let you know.
Real-World Examples:
Stripe (Payment Processing):
Someone pays you → Stripe rings your webhook doorbell → "Hey! You just got paid $50!"
Twilio (SMS/Text Messages):
Someone texts your business number → Twilio rings your webhook doorbell → "Hey! You got a text message!"
Mailchimp (Email Marketing):
Someone subscribes to your newsletter → Mailchimp rings your webhook doorbell → "Hey! New subscriber!"
Why you need webhooks: Without webhooks, your app would have to constantly ask these services "Did anything happen yet? Did anything happen yet?" over and over. Webhooks let them tell YOU when something happens.
The Problem with Vibe Coding Webhooks
Here's the thing: asking Replit Agent to "add webhooks for Stripe payments" sounds simple. And the agent WILL add them. But without asking the right questions, you might end up with webhooks that:
Accept fake messages from hackers pretending to be the service e.g. Stripe (security - worst)
Process the same payment twice (money - very bad)
Lose messages when your app goes down (reliability)
Timeout and fail because they take too long to respond (performance)
Crash your app when something unexpected happens (stability)
The good news: If you ask the right questions BEFORE deploying, the Agent will catch all of these.
How to Use This Guide
Your Pre-Deployment Workflow:
Build your feature: "Add Stripe payment webhooks to handle successful payments…or recurring subscription payments"
Ask these questions: Use the questions in this guide (copy-paste them to Replit Agent)
Review the answers: Make sure the agent addressed each concern
Test thoroughly: Use the testing strategies below
Deploy confidently: Your webhooks are production-ready
Important: Don't wait until AFTER deployment to ask these questions. Ask them while you're still building, so the agent can implement solutions properly.
The Questions to Ask Your Replit Agent
Copy these questions and paste them to Replit Agent after it adds webhooks to your app. The agent will either confirm it already handled these, or it will add the necessary code.
-
How do you know this message really came from [service]?
What you're checking: The webhook verifies the message is actually from Stripe/Twilio/etc., not from a hacker.Good answer includes:
We verify the signature using the webhook secret
We use stripe.webhooks.constructEvent()
Invalid signatures are rejected immediately with 400 status
Red flag answer:
We accept all incoming webhooks
We trust the message
No mention of signature/secret
Why it matters: Without this, hackers can POST fake "payment succeeded" messages and get free access to your product.
-
Is the webhook endpoint protected from random people hitting it?
What you're checking: Only the external service can access your webhook, not random internet users.
Good answer includes:
The endpoint is public but validates signatures
We use rate limiting to prevent spam
We return 429 Too Many Requests if limit is exceeded
IPs that fail signature checks repeatedly get blocked
Red flag answer:
We process every request that comes in
No rate limiting mentioned
We rely on Stripe's signature check only
Why it matters: Even if you verify signatures, attackers can flood your endpoint with fake requests, wasting your server resources and potentially causing downtime.
-
What if the same message arrives twice?
What you're checking: Duplicate messages don't cause duplicate actions (like charging a customer twice or sending two confirmation emails).
Good answer includes:
We use idempotency - we track processed event IDs
We check if we've already processed this webhook ID
Duplicates are detected and skipped
Red Flag answer:
We process every webhook we receive
We rely on service (e.g. Stripe) not to send duplicates
No mention of storing/checking event IDs
Why it matters: Stripe, for example, WILL send duplicates (due to network issues, retries). Without idempotency, your customer gets charged twice or receives 5 confirmation emails.
Bonus points if the Agent mention:
We use a database transaction to check-and-process atomically
We store event IDs with a TTL/expiry so the table doesn't grow forever…pay attention to this one
-
What if processing fails - will it retry forever?
Good answer includes:
We return a 200 status immediately, then process in the background
Failed processing is logged for manual retry
We have a dead letter queue for permanently failed webhooks
We have alerts when webhooks fail repeatedly
Red flag answer:
We return 500 on errors so Stripe retries
We do all processing before returning 200
No mention of background processing or queue
The nuance beginners miss:
Some think "return 200 always" is the solution. But you need BOTH:
Return 200 quickly (so service like Stripe stops retrying)
Actually process the event reliably (background job + error handling)
Why this matters: If your webhook takes too long or fails, services like Stripe will keep retrying (sometimes up to 3 days). You need a strategy to handle failures without breaking your app.
The Pattern:
Receive webhook → validate signature
Save event to database (quick)
Return 200 immediately
Process event in background job
If background fails → alert + manual retry option
-
What if my app is down when the message arrives?
What you're checking: You have a plan to recover missed webhooks.
Good answer includes:
Most services will retry automatically for several hours or days
We can manually replay webhooks from the service's dashboard
We log when webhooks are missed so we can investigate
Red Flag answer:
We just hope the app doesn't go down
We don't have monitoring for uptime
No awareness of retry behavior
Real scenario: Your Replit app crashes at 2 AM. A customer makes a payment at 2:15 AM. Stripe sends the webhook, but your app is down. Stripe will retry multiple times over the next 3 days. When your app comes back up, it will receive the webhook.
Side note: Free Replit apps may "sleep" after inactivity. A webhook hitting a sleeping app will wake it up, but there's a delay. For production webhooks, use Replit Deployments (always-on) or ensure your app stays awake.
Know your service: Different services have different retry policies:Stripe: Retries for 3 days
Twilio: Retries for 24 hours
(Check your service's docs!)
-
What events are we listening for?
What you're checking: You know exactly which events your webhook processes.
Good answer includes: A specific list of event types.
Example for Stripe:
payment_intent.succeeded - Payment was successful
payment_intent.payment_failed - Payment failed
customer.subscription.created - New subscription
customer.subscription.deleted - Subscription canceled
invoice.payment_succeeded - Subscription payment processed
Red flag answer:
We handle all events the same way
I'm not sure which events we listen for
No documented list of handled events
Why it matters: Services send MANY event types. If you don't know which ones you handle, you might:
Miss critical events (subscription.canceled)
Process events you shouldn't (test events in production)
Waste resources processing irrelevant events
Pro tip: Ask the Agent to list ALL events your webhook(s) handles and what action each one triggers. And write the details out to a running document in a MyDocs folder which is NOT accessible to the public. Keep referring to this as you build out your app.
-
Are we handling ALL the important events, not just the happy path?
What you're checking: You're not just handling successful payments, but also failures, refunds, disputes, cancellations, etc.
Common mistake: Only handling payment_intent.succeeded but not payment_intent.payment_failed. This means your app knows when payments work but has no idea when they fail!
Good answer includes:
We handle success events: [list]
We handle failure events: [list]
We handle cancellation events: [list]
We handle refund/dispute events: [list]
For any webhook integration, ask about these categories:
Success
Failure
Cancellation
Reversal
Updates
Expiration
Not every service has all categories, but if a category exists for your service and you're not handling it - that's a gap.
Why it matters: The "happy path" is often 80% of traffic but 20% of the complexity. The edge cases (failures, disputes, cancellations) are where money gets lost and customers get angry.
-
What happens if we get an event type we don't recognize?
What you're checking: Unknown events don't crash your app.
Good answer includes:
Unknown events are logged and ignored
We return 200 OK even for events we don't process
We can add new event handlers without breaking existing ones
Why this matters: Services add new event types all the time. Your webhook should handle events it doesn't recognize gracefully instead of crashing.
Pro tip: Log unknown events - they might be NEW events from the service that you SHOULD handle. Periodic review of "unhandled event" logs helps you catch gaps.
-
Do we respond quickly enough?
What you're checking: Your webhook responds within 30 seconds (ideally within 5 seconds).
Good answer includes:
We respond with 200 OK immediately
Heavy processing happens in the background
Response time is under 5 seconds
Bad: Receive → Email → Database → SMS → PDF → Respond (45s)
Good: Receive → Respond (0.5s) → Queue background job → Done! → Email, DB, SMS, PDF
The beginner takeaway: Respond first, work later. Your webhook's only job is to say "got it" quickly. Everything else happens in the background.
-
Are we doing heavy processing in the background, not blocking the response?
What you're checking: Time-consuming tasks don't block the webhook response.
Good answer includes:
We queue background jobs for heavy processing
We use a job queue system (Replit's built-in or external)
Webhook responds immediately, processing happens async
Heavy tasks that should be in background:
Sending emails
Generating PDFs
Making API calls to other services
Processing large amounts of data
Updating external systems
Light tasks that can happen immediately:
Storing the webhook data in database
Validating the signature
Checking for duplicates
Returning 200 OK
-
How do I see what webhooks we received?
What you're checking: You have visibility into incoming webhooks.
Good answer includes:
All webhooks are logged to the database with timestamp
You can view webhook history in the admin dashboard
We log event type, status, and processing result
Red Flag answer:
Check the console logs
We don’t log webhooks
We only log errors
What to log for each webhook:
Event ID
Event type
Timestamp received
Processing status (success/failure)
Error message (if failed)
Response time
Log identifiers, not data. Store "customer_id: cus_123" not "customer_email: john@example.com"
Why it matters: When something goes wrong at 3 AM, logs are how you figure out what happened. "A webhook failed" vs "Webhook evt_abc123 (payment.succeeded) failed at 3:02 AM with error: database timeout" - which would you rather debug?
Bonus points:
Logs are retained for X days
Old logs are automatically cleaned up - pay attention to this
-
Can I replay a failed webhook to test?
What you're checking: You can recover from failures without losing customer data or asking customers to repeat actions.
Good answer includes:
Failed webhooks can be replayed from the admin dashboard
You can replay webhooks from the service's dashboard (Stripe, etc.)
We store the full webhook payload for replay
Why this matters: A webhook fails because your database was briefly down. You fix the database. Now you need to replay that webhook so the order gets marked as paid.
IMPORTANT: If storing payloads for replay:
Encrypt sensitive data at rest
Set retention limits (don't store forever) - pay attention to this. Could come back to bite you later
Audit who can trigger replays.
Ask the Agent to confirm if such data is encrypted at rest etc.
-
Are we logging enough to debug issues without logging sensitive data?
What you're checking: Logs are helpful but don't expose customer data.
Good answer includes:
We log event metadata but not full customer details
Sensitive fields (like credit card info) are not logged
We log enough to trace the webhook flow
Red Flag answer:
We log the full request body
We log everything for debugging
No mention of data sensitivity
Safe to log:
Event ID: evt_1234567890
Event type: payment_intent.succeeded
Customer ID: cus_ABC123
Amount: $50.00
Status: success
NOT safe to log:
Credit card numbers (log last 4 only: ****4242)
CVV codes (never store these at all)
Social security numbers
Passwords/tokens
Full customer addresses (log city/country only, or hash it)
Email addresses (log domain only: ***@gmail.com)
Phone numbers (log last 4: ***-**-1234)
Why it matters: Logging PII can violate GDPR, CCPA, and PCI-DSS. Even if you're small, getting this wrong early creates a mess to clean up later.
-
How do I test webhooks locally during development?
What you're checking: You can test webhooks without deploying.
Good answer includes:
We use [service]'s CLI to forward webhooks locally
We can trigger test events manually
We have a way to see what webhooks arrived
On Replit, your app is already publicly accessible. Point the webhook URL to your Replit preview URL. For Stripe, you can also use `stripe listen --forward-to [url]` and trigger test events with `stripe trigger payment_intent.succeeded`.
Checkyour server logs to confirm webhooks are received.
-
Is there a way to simulate events?
Why it matters: Testing with real transactions means real money, real customers, and real consequences when things break. Test mode lets you break things safely.
Good answer includes:
The service has a test mode with test API keys
We can trigger test events from the service dashboard
We have a local testing endpoint that accepts sample payloads
Example testing flow:
Use test API keys (e.g. Stripe gives you test keys)
Make a test payment with card number 4242 4242 4242 4242
Webhook fires with test data
Verify your app handles it correctly
No real money involved!
Check if the service (Stripe, PayPal, Twilio etc.) have a Sandbox environment and learn how to use it.
Common Webhook Mistakes (And How to Avoid Them)
Mistake #1: No Signature Verification
The Problem: Anyone can send fake webhooks to your endpoint.
The Fix: Always verify signatures using the service's official library. Let the Agent confirm this.
Mistake #2: No Duplicate Detection
The Problem: Same webhook processed twice = customer charged twice.
The Fix: Store event IDs and check before processing. The Agent handles this during implementation, ask to confirm.
Mistake #3: Slow Response Times
The Problem: Webhook takes 60 seconds to respond → timeout → service retries → duplicate processing.
The Fix: Respond with 200 OK immediately, process in background. Depending on the complexity of your app, you should be aware how it scales.
Mistake #4: Only Handling Success Events
The Problem: You know when payments succeed but have no idea when they fail.
The Fix: Handle ALL important events: success, failure, refunds, disputes, cancellations. Conform with the Agent.
Mistake #5: No Logging
The Problem: Webhook fails and you have no idea what happened.
The Fix: Log every webhook with status and error messages. Confirm with the agent if this is being done and how you can access the data.
Mistake #6: Can't Test Locally
The Problem: You have to deploy to production to test webhooks.
The Fix: Use the service's CLI or test mode, if they have one, to test locally.
Putting It All Together: Your Pre-Deployment Checklist
The Webhook Deployment Checklist
Use this checklist before deploying any app with webhooks to ensure you don't miss critical features.
Security
- Webhook verifies signatures from the service
- Invalid signatures are rejected
- Rate limiting is in place
Reliability
- Duplicate webhooks are detected and skipped (idempotency)
- Failed processing doesn't cause infinite retries
- Plan in place for missed webhooks (service retries)
Data
- All important event types are handled (success AND failure)
- Unknown event types don't crash the app
- We know exactly what events we're listening for
Timing
- Webhook responds within 5-30 seconds
- Heavy processing happens in background jobs
Logging
- All webhooks are logged with timestamp and status
- Failed webhooks can be replayed
- Logs don't expose sensitive customer data
- Admin dashboard shows webhook history
Testing
- Tested locally with service's CLI or test mode
- Tested all important event types
- Tested duplicate webhook handling
- Tested timeout scenarios
- Tested with invalid signatures
Before deploying, verify ALL boxes are checked!
Wrapping Up
When you ask an AI to, for example, "add Stripe payments" or "set up subscriptions," webhooks are often part of the solution - even if you didn't ask for them. That's the nature of Vibe Coding: the AI handles the technical decisions. But webhooks are easy to get wrong, even for AI agents. That's why these 15 questions matter. You don't need to understand the technical details - you just need to verify the AI's work. Before you deploy any feature involving payments, subscriptions, or external services, run through this checklist. Your customers (and your bank account) will thank you. The pattern: Ask → Check the answer → Deploy with confidence.

Complete Guide to Building Secure Authentication (Part 2)
Ready to take your authentication from basic to bulletproof? Part 2 covers the advanced security features that protect your users and your business: admin MFA that can't be bypassed, error messages that help users without helping hackers, email integration that actually works, database security that stops attacks cold, and testing procedures that catch vulnerabilities before launch. If Part 1 taught you the fundamentals, Part 2 shows you how to build like a pro-perfect for young engineers and vibe coders using Replit to create secure applications without needing a computer science degree. More practical checklists and real-world examples ahead.
Authentication & Login Security Checklist
Use this checklist when building any app with user login to ensure you don't miss critical security features.
In Part 1, you learned WHY authentication security matters and HOW each feature works. In my Replit Authentication Prompt post, you got the complete copy-paste prompt to build it.
Now comes Part 2: The Checklists.
Think of this as your quality assurance toolkit. Before you deploy, before you launch, before you tell anyone your app is ready, run through these checklists. They're compiled from 15+ years of building secure systems and represent the security features that separate hobby projects from production-ready applications.
This is Part 2 of a multi-part checklist series. I'm breaking this into digestible pieces so you can focus on one area at a time without getting overwhelmed.
In This Post (Part 2 - Core Security):
Basic Requirements (registration, login, passwords)
Error Messages (critical for security AND UX)
Security Features (validation, rate limiting, data protection)
Customer Experience
Admin Security
Background Jobs
Logging & Monitoring
Common Mistakes to Avoid
Coming in Future Parts:
Part 3: Testing & Deployment Checklist
Part 4: Advanced Security & Compliance
Part 5: Performance & Scaling Checklist
How to Use This Checklist:
Print it or keep it open in another tab
Check off items as you build/verify
Don't skip items, they're all here for a reason
Come back to this for every new project
Already built your authentication system? Use this to audit what you have and identify gaps.
Haven't built it yet? Start with my Replit prompt, then use this to verify everything works.
Let's make sure your app is secure before it goes live.
BASIC REQUIREMENTS (Must Have - No Exceptions!)
Registration & Signup
- Email and password are required fields
- First name and last name are collected
- Password must be at least 12 characters long
- Password must include uppercase, lowercase, numbers, and special characters
- Show a real-time password strength indicator (weak/medium/strong)
- Show password requirements BEFORE user starts typing
- Send verification email that expires in 24 hours
- Users cannot login until they verify their email
- Delete unverified accounts after 48 hours automatically
Login System
- Login uses email and password only (no username)
- Password field is hidden by default with show/hide toggle button
- Lock account after 20 failed login attempts
- Send email notification when account is locked
- Account stays locked for 24 hours OR until admin unlocks it
- Show clear message: "Your account has been locked for security. Try again in 24 hours."
Password Reset
- "Forgot Password" link on login page
- Reset email expires in 24 hours
- After 8 reset attempts, delay email by 5 minutes
- New password must meet the same complexity requirements
- Send confirmation email after successful password change
Password Security
- NEVER store passwords in plain text
- Use bcrypt or Argon2 to hash passwords
- Prevent users from reusing their last 5 passwords
- All password fields hide text by default (show dots/asterisks)
Session Management
- Auto-logout after 30 minutes of inactivity (customers)
- Auto-logout after 15 minutes of inactivity (admins)
- Use secure cookies (httpOnly and secure flags)
- Destroy session completely on logout
ERROR MESSAGES (Critical for Security!)
What Users Should See:
- ✅ "The email or password is incorrect. Please try again."
- ✅ "This email is already registered. Please try logging in."
- ✅ "Your password must include at least one uppercase letter."
- ✅ "We're experiencing technical difficulties. Please try again shortly."
What Users Should NEVER See:
- ❌ "Error 4042: Database constraint violation"
- ❌ "Authentication failed (ERR_AUTH_001)"
- ❌ "Password hash comparison failed"
- ❌ "500 Internal Server Error"
- ❌ Any error codes, system codes, or technical jargon
RULE: If an error message mentions code, database, system, or technical terms - FIX IT IMMEDIATELY!
SECURITY FEATURES (Must Have)
Input Validation
- Validate and sanitize ALL user inputs
- Prevent SQL injection attacks
- Prevent XSS (Cross-Site Scripting) attacks
- Reject emails that don't match proper email format
- Reject passwords that don't meet complexity requirements
Rate Limiting
- Limit login attempts (lock after 20 failures)
- Limit password reset requests (delay after 8 attempts)
- Limit API calls per user to prevent abuse
- Add delays between failed attempts (exponential backoff)
Email Verification
- Email verification links expire in 24 hours
- Each verification link can only be used once
- Send new verification email if requested
- Clear message when link expires
Data Protection
- Use HTTPS/TLS 1.2+ for ALL connections
- Never send passwords in URLs or query parameters
- Don't reveal if an email exists in the system (same error message)
- Store sensitive data encrypted in the database
CUSTOMER EXPERIENCE (Keep It Simple!)
Customer Profile Page
- View and edit first name and last name
- View email (but can't edit without verification)
- Change password with current password required
- View recent login activity (date/time only)
- Logout button
- Delete account option (with confirmation)
What Customers Should NOT See:
- ❌ Admin features or settings
- ❌ Other users' information
- ❌ System logs or technical details
- ❌ Database errors or codes
ADMIN SECURITY (Extra Protection!)
Admin Account Setup
- Admins MUST use Multi-Factor Authentication (MFA)
- Admin MFA via 6-digit email code
- Admin accounts cannot be created through public signup
- First Super Admin created during initial setup
- dmin sessions timeout after 15 minutes (shorter than customers)
Admin Access Controls
- Require password re-entry for sensitive actions:
- Unlocking customer accounts
- Deactivating accounts
- Viewing detailed logs
- Send email alert to all Super Admins when any admin logs in
- Log every admin action with timestamp and IP address
Admin Dashboard Features
- View all customers (name, email, status, last login)
- Search and filter customers
- Unlock locked accounts (with justification note)
- Force logout customer sessions
- Deactivate/reactivate accounts
- View customer login history
- View system overview (total users, active sessions, failed logins)
What Admins Can/Should NOT Do:
- ❌ Reset customer passwords directly
- ❌ See customer passwords (not even admins!)
- ❌ Login as a customer
- ❌ Bypass MFA
EMAIL TEMPLATES NEEDED
Make sure your app sends these emails:
Customer Emails:
- Email verification (with link that expires in 24 hours)
- Welcome email after verification
- Password reset link (expires in 24 hours)
- Account locked notification
- Account unlocked by admin notification
- Password changed confirmation
- Account deleted confirmation
Admin Emails:
- Admin MFA code (6 digits, expires in 10 minutes)
- Admin login alert (to all Super Admins)
- Failed admin login attempts (after 5 failures)
- Background job failures
- Suspicious activity alerts
BACKGROUND JOBS (Automated Maintenance)
Set up these automatic tasks:
- Delete unverified accounts after 48 hours
- Clean up expired password reset tokens
- Clean up expired email verification tokens
- Clean up expired MFA codes
- Archive old logs (based on retention policy)
- Optional: Auto-unlock accounts after 24 hours
- Monitor email delivery failures
Background Job Monitoring:
By default, all background jobs added by the Replit agent works behind the scenes unattended, but in a production enviroment, you need to know their status, ideally from your app's dashboard.
- Display job status in admin dashboard
- Show last run time and status (success/failure)
- Alert admins when jobs fail
- Allow manual trigger (admins only)
LOGGING & MONITORING (Know What's Happening)
What to Log (Admin View Only):
- All login attempts (successful and failed)
- Account lockouts and unlocks
- Password reset requests
- Password changes
- Admin actions (who did what, when)
- Failed MFA attempts
- Email delivery failures
- Background job results
What NOT to Log:
- ❌ Actual passwords (never ever!)
- ❌ Full credit card numbers
- ❌ Social security numbers
- ❌ Other sensitive personal data
COMMON MISTAKES TO AVOID
Security Mistakes:
- ❌ Storing passwords in plain text → ✅ Always hash with bcrypt/Argon2
- ❌ Using weak password requirements → ✅ Enforce 12+ chars with complexity
- ❌ Not limiting login attempts → ✅ Lock after 20 failures
- ❌ Sending passwords in emails → ✅ Only send reset links, never passwords
- ❌ Not using HTTPS → ✅ Always use HTTPS/TLS
- ❌ Exposing technical errors to users → ✅ Show friendly messages
- ❌ Not validating user input → ✅ Validate and sanitize everything
- ❌ Allowing admins to reset customer passwords → ✅ Only unlock, customers reset themselves
User Experience Mistakes:
- ❌ Showing error codes to users → ✅ Use plain language
- ❌ Not explaining why password was rejected → ✅ Show specific requirements
- ❌ Making forms too complicated → ✅ Keep it simple (name, email, password)
- ❌ Not confirming actions → ✅ Send confirmation emails
- ❌ Confusing navigation → ✅ Clear buttons and labels
Admin Mistakes:
- ❌ Not protecting admin accounts → ✅ Require MFA for all admins
- ❌ Not logging admin actions → ✅ Log everything admins do
- ❌ Allowing admins to see passwords → ✅ Nobody sees passwords, ever
- ❌ Not requiring password re-entry → ✅ Sensitive actions need password
Wrapping Up
I hope you find this first checklist compilation helpful in building secure, production-ready applications. Whether you're launching your first SaaS platform, building an e-commerce site, or creating any customer-facing web app, this checklist gives you the security foundation you need without requiring deep security expertise.
Found a Gap?
Don't panic. Go back to the Replit prompt, add the missing feature, test it, and check it off. That's the beauty of checklists, they show you exactly where you are and what's left to do.
Remember: security doesn't have to be complicated, it just has to be done right from the start.
Now go build something secure.

Complete Replit Authentication Prompt
Building a customer-facing app in Replit? This production-ready authentication prompt is designed for US-based development and non-HIPAA applications. It includes secure registration, login, password management, admin features with MFA, and complete audit logging. No security expertise required. Just copy, paste into Replit, and build. Perfect for SaaS platforms, e-commerce sites, membership platforms, and general web applications.
Important Notes
Non-HIPAA Compliant: This prompt is for general web applications, NOT healthcare or medical data
US Development: Designed for US-based development practices and standards
Suitable For: SaaS platforms, e-commerce sites, membership platforms, customer portals, general web apps
NOT Suitable For: Healthcare applications, medical records, patient data, or any HIPAA-regulated information
Customized: This is a custom login flow rather than using Replit Auth, their integrated (white-labeled) authentication
MFA: Multi Factor Authentication is done by email and not SMS
CAPTCHA Intentionally Omitted: Replit does not currently (at the time of writing this) support CAPTCHA integration. This prompt uses rate limiting and exponential backoff as bot protection instead. If you need CAPTCHA, you'll need to integrate it separately after deployment (e.g., Google reCAPTCHA, hCaptcha).
Need HIPAA compliance? Contact me for a specialized authentication prompt.
What This Prompt Builds
This comprehensive Replit prompt creates a complete, production-ready authentication system with enterprise-grade security features. Simply copy, paste into Replit, and let it build your secure login system.
-
Email & password registration
Email verification (24-hour tokens)
Secure login with rate limiting
Account lockout (20 failed attempts)
Password reset flow
Session management (30-min timeout)
Profile management
-
Mandatory Multi-Factor Authentication
Customer account management
Unlock locked accounts
Force logout sessions
Complete audit logging
Background job monitoring
Activity dashboards
-
Password hashing (bcrypt/Argon2)
CSRF protection
SQL injection prevention
XSS attack protection
Rate limiting
Secure session cookies
TLS 1.2+ encryption
Perfect For These Applications
SaaS Platforms - Customer accounts, subscriptions, team management
E-commerce Sites - Customer accounts, order history, wishlists
Membership Platforms - Community sites, online courses, content access
Customer Portals - Support tickets, account management, billing
Web Applications - Any app needing secure user authentication
Internal Tools - Employee dashboards, admin panels, management systems
Important Note on Financial Applications:
Notice that I did NOT mention financial applications. In such cases, you'll have to tweak Account Lockout to 3-5 attempts to be in alignment with PCI-DSS and other regulatory compliance requirements. Financial apps also require additional security measures beyond this prompt.
How to Use This Prompt
Step 1: Copy the Prompt
Scroll down and copy the entire prompt below (see The Complete Prompt)
Step 2: Open Replit
Go to Replit.com and start a new project
Step 3: Paste & Configure
Paste the prompt into Replit's AI chat. Replit will ask you:
What email service to use (e.g. ReSend, SendGrid, AWS SES, etc.)
Your app name
Any custom configurations
Step 4: Let Replit Build
Replit will automagically:
Choose the best backend framework
Set up the database
Create all authentication flows
Configure security features
Set up email templates
Add some sprinkles and pixie dust
Step 5: Test Everything
Use the testing checklist (separate post coming soon)
What Makes This Prompt Special
User-Friendly Error Messages
No technical jargon for customers. All error messages are clear, helpful, and actionable:
"The email or password you entered is incorrect. Please try again."
NOT: "Error 4042: Database constraint violation"
Security Best Practices
Admins can only unlock accounts, not reset passwords
Password re-entry required for sensitive admin actions
Complete audit trail of all admin activities
Mandatory MFA for all admin accounts
Automated Maintenance
Background jobs:
Deleting unverified accounts after 48 hours
Cleaning up expired tokens
Archiving old logs
Monitoring email delivery
Complete Admin Dashboard
View all customers and their activity
Unlock locked accounts
Monitor background jobs
Search and filter everything
Export audit logs
The Complete Prompt
Instructions: Copy everything in the code block below and paste it into Replit.
Create a secure user authentication system with login, registration, and password management for a customer-facing service where customers can sign up and admins can manage accounts.

Registration & Email Verification:
- Registration form with mandatory fields: first name, last name, email, and password
- Display password requirements before user starts typing
- Real-time password complexity indicator showing strength (weak/medium/strong/very strong)
- Enforce password requirements: minimum 12 characters, mix of uppercase, lowercase, numbers, and special characters
- Send email verification link that expires in 24 hours
- Require acceptance of Terms of Service and Privacy Policy
- Users cannot login until email is verified
- All customer signups automatically assigned "Customer" role
- Validate and sanitize all text inputs to prevent SQL injection and XSS attacks
- Background job to automatically delete unverified user accounts after 48 hours

Login System:
- Email and password login fields
- Password field hidden by default with show/hide toggle button (eye)
- "Remember me" option for convenience
- Implement rate limiting to prevent brute force attacks
- Redirect customers to profile/dashboard after login
- Redirect admins to admin dashboard after login

Bot Protection (CAPTCHA Alternative):
Note: Since Replit does not currently support CAPTCHA, this system uses rate limiting and exponential backoff for bot protection:
- Progressive delays after failed attempts (1 sec, 2 sec, 4 sec, 8 sec, etc.)
- IP-based rate limiting to detect automated attacks
- Account lockout after 20 failed attempts

Account Lockout Policy:
- Automatically lock account after 20 consecutive failed login attempts
- Lockout remains for 24 hours or until admin unlocks
- Send email notification when account is locked
- Lockout counter resets after successful login
- Display clear message: "Your account has been temporarily locked for security. Please try again in 24 hours or contact support."

Password Management:
- Password history: prevent reuse of last 5 passwords
- Password reset via "Forgot Password" link (reset link expires in 24 hours)
- After 8 password reset attempts, delay sending email by 5 minutes
- New password must meet complexity requirements with visual strength indicator

Customer Profile Page:
- View and edit first name and last name
- View and select timezone (auto-detected from browser, with manual override option)
- View email address (display only)
- Change email address functionality:
  * Request email change
  * Send verification link to NEW email address
  * NEW email must be verified before change takes effect
  * Send notification to OLD email about pending change
  * OLD email can cancel the change (security feature)
  * Once new email verified, update account and send confirmation to both emails
- Change password functionality
- View recent login activity (date/time displayed in user's selected timezone, device type)
- Export personal data (profile information, login history, activity logs)
- Logout button
- Delete account option (with confirmation and data purge notice)

User-Facing Messages - CRITICAL:
All customer-facing messages must:
- Use clear, plain language
- NEVER display error codes, system codes, or technical jargon
- Be helpful and actionable
- Be friendly and professional

Examples:
GOOD: "The email or password you entered is incorrect. Please try again."
GOOD: "This email address is already registered. Please try logging in."
GOOD: "Your password must include at least one uppercase letter."
GOOD: "This verification link has expired. Please request a new one."
GOOD: "Your account has been temporarily locked for security. Please try again in 24 hours."
GOOD: "Please enter the verification code we sent to your email."
BAD: "Error 4042: Database constraint violation"
BAD: "Authentication failed (ERR_AUTH_001)"

Admin Security (Enhanced):
- Admin accounts MUST have Multi-Factor Authentication (MFA) enabled (mandatory, non-optional)
- Admin MFA via email OTP code (6-digit code)
- Admin session timeout after 15 minutes of inactivity (shorter than customer sessions)
- Require password re-entry for sensitive actions:
  * Unlocking customer accounts
  * Deactivating/reactivating accounts
  * Viewing detailed customer activity logs
  * Triggering manual background jobs
- Log all admin actions with:
  * Admin user ID and name
  * Timestamp
  * IP address
  * Action performed
  * Customer affected (if applicable)
  * Justification note (for sensitive actions)
- Alert all Super Admins via email when any admin account logs in

Admin Dashboard:
- View all customers showing:
  * Full name
  * Email address
  * Account creation date
  * Account status (active/locked/deactivated)
  * Failed login attempt counter
  * Last login date
- Search and filter customers by name, email, date, or status
- View individual customer details:
  * Full profile information
  * Login history with timestamps and IP addresses
  * Active sessions
  * Failed login attempts
  * Password reset history (dates only, not actual passwords)
  * Account status
- Failed login attempts by IP Addresses grid
- Admin actions available:
  * Manually unlock locked accounts (requires password re-entry + justification note)
  * Force logout customer sessions
  * Deactivate/reactivate accounts (requires password re-entry + justification)
  * View complete activity audit trail
  * IMPORTANT - Admins CANNOT reset customer passwords or trigger password resets
- System overview dashboard:
  * Total users count
  * Active sessions count
  * Failed logins today
  * Locked accounts count
  * Recent activity log
  * Admin activity log (recent admin actions)
- Admin Management (Super Admin only):
  * View all admin accounts
  * Create new admin accounts (with automatic MFA setup)
  * Deactivate admin accounts
  * View admin login history and actions
  * Change admin roles (Admin or Super Admin)

Customer Support for Password Issues:
- If customer is locked out: Admin unlocks account → customer uses "Forgot Password" themselves
- If customer can't access their email:
  * Admin to verify customer identity through alternative means (phone verification, account details, security questions)
  * Admin unlocks account only after identity verification
  * Customer must use "Forgot Password" to regain access
- All unlock actions must include:
  * Justification note explaining reason
  * Admin password re-entry for verification
  * Automatic logging with full details
- Customer receives email notification: "Your account was unlocked by our support team. If you didn't request this, please contact us immediately and change your password."

Background Jobs Monitor (Admin View):
- Display all scheduled background jobs:
  * Job name/type
  * Last run date/time
  * Status (Success/Failure)
  * Records processed
  * Error messages (if failed)
  * Next scheduled run time
- Job history log with filtering
- Visual status indicators (green/red/yellow)
- Alert notifications when jobs fail
- Manual trigger option for each job (requires admin password re-entry)

Background Jobs:
- Clean up unverified accounts older than 48 hours
- Clean up expired password reset tokens
- Clean up expired email verification tokens
- Clean up expired MFA codes (admin MFA)
- Archive old logs based on retention policy
- Monitor email deliverability issues
- Optional: Auto-unlock accounts after 24 hours
- Clean up expired admin sessions

Security Requirements:
- Use bcrypt or Argon2 for password hashing
- Use TLS 1.2+ for all data transmission
- Generate cryptographically secure random tokens
- Implement secure session management with httpOnly and secure cookies
- Add CSRF protection on all forms
- Protect against account enumeration (same message for valid/invalid emails)
- Automatic session timeout: 30 minutes for customers, 15 minutes for admins
- Rate limiting on all authentication endpoints
- Separate rate limiting for admin login attempts (stricter than customer limits)
- Admin MFA codes expire after 10 minutes
- Log all failed admin login attempts with alerts after 5 failures
- Create necessary database indexes for efficient lookups:
  * Index on users.email (for login lookups)
  * Index on users.id (primary key)
  * Index on login_attempts.user_id (for attempt tracking)
  * Index on password_reset_tokens.token (for reset lookups)
  * Index on email_verification_tokens.token (for verification lookups)
  * Index on sessions.user_id (for session management)
  * Index on admin_logs.admin_id and admin_logs.timestamp (for audit queries)

Privacy & Data Handling:
- All timestamps stored in UTC timezone in database
- Timezone auto-detected from user's browser on first visit
- User can manually override timezone in profile settings
- All timestamps displayed in UI converted to user's selected timezone
- IP addresses logged for security purposes and retained for 90 days
- Include IP logging disclosure in Privacy Policy
- Complete account deletion includes purging all user data after retention period

Admin Account Creation:
- Admin accounts created through secure backend process (not public registration)
- Role types: Super Admin and Admin
- All new admin accounts automatically require MFA setup on first login
- Super Admins can create/manage other admin accounts
- Initial Super Admin account created during system setup

Additional Features:
- User-friendly error messages (no technical jargon for customers)
- Detailed error logging for admin troubleshooting
- Visual feedback for form validations
- Loading states for all operations
- Responsive, professional UI design
- Toast notifications for important events
- Audit trail viewer in admin dashboard (searchable and filterable)
- Admin activity dashboard showing recent admin actions

Email Integration:
Prompt me for email service credentials (SMTP settings or API keys) during setup.

Email Templates Needed:
- Email verification (customers)
- Welcome email after verification (customers)
- Password reset (customers)
- Account locked notification (customers)
- Account unlocked by admin notification (customers) - includes security warning
- Password changed confirmation (customers)
- Email change request verification (to NEW email)
- Email change notification (to OLD email with cancel option)
- Email changed confirmation (to both OLD and NEW emails)
- Account deletion confirmation (customers)
- Admin MFA code delivery
- Admin login alert (to all Super Admins)
- Account unlocked by admin alert (to customer with security notice)
- Background job failure alerts (to admins)
- Suspicious admin activity alert (to Super Admins)
- Multiple failed admin login attempts alert (to Super Admins)

Audit Logging:
All admin actions must be logged with:
- Admin user ID and full name
- Timestamp (date and time)
- IP address
- Action type (unlock account, force logout, deactivate account, etc.)
- Customer affected (User ID, name, email)
- Justification/reason provided
- Result (success/failure)
- Session ID

Initial Setup:
- Instructions for creating the first Super Admin account securely
- First Super Admin must set up MFA during initial setup
- Configuration for admin email addresses
- Configuration for Super Admin alert emails
- Configure account lockout settings (20 attempts, 24-hour lockout)
- Configure password complexity requirements
- Configure session timeout settings (customers: 30 min, admins: 15 min)
- Configure admin MFA settings (code expiration, delivery method)

Build a complete, production-ready authentication system with clear security implementations and setup instructions. Keep the implementation simple and straightforward while maintaining good security practices. Take future scaling into consideration.

CRITICAL SECURITY PRINCIPLES:
1. Customers always control their own password resets - admins can only unlock accounts
2. Admins must use MFA for all logins (mandatory, non-optional)
3. Sensitive admin actions require password re-entry
4. All admin actions are logged with full audit trail
5. Customer-facing messages are clear and friendly with no technical jargon
6. Admin dashboard can show technical details for troubleshooting
After You Build
Testing Checklist
Don't skip testing! Verify these critical features:
Registration creates account and sends verification email
Verification link works and expires after 24 hours
Login works with correct credentials
Account locks after 20 failed attempts
Password reset sends email with working link
Admin MFA is required and works
Admin can unlock customer accounts
All admin actions are logged
Background jobs run successfully
Error messages are user-friendly (no codes!)
Need detailed testing instructions? Check out my Complete Authentication Guide for step-by-step testing procedures…coming soon.
Ready to Build?
You have everything you need. Copy the prompt, open Replit, and build something amazing.
Security doesn't have to be hard. It just has to be done right.

Complete Guide to Building Secure Authentication (Part 1)
Building Secure Authentication for Replit Beginners and Vibe Coders
If you're building your first app in Replit, authentication might seem intimidating. This guide breaks down everything you need to know about user login and signup, explained in plain language.
You'll learn why password hashing matters, how account lockout stops hackers, the secure way to reset passwords, and why email verification prevents fake accounts. Every concept includes real examples showing the right way versus the wrong way.
This guide is for young engineers and vibe coders with basic programming skills who want to build authentication that actually protects users. No advanced security knowledge required.
Security isn't optional. Your users trust you with their data. This guide shows you how to build it right from day one.

For Young Engineers and Vibe Coders using Replit
Seriously, this is meant for the beginners.
Introduction - Why Security Matters
The Real Cost of Poor Security
Bad security can:
Get your app hacked and customer data stolen
Destroy your reputation and lose customers
Result in legal problems and fines
Cost thousands of dollars to fix after launch
Get your app shut down by hosting providers
Good security:
Protects your users' personal information
Builds trust with your customers
Prevents costly breaches and lawsuits
Makes your app professional and credible
Helps you sleep better at night
What You'll Learn
This guide teaches you how to build authentication (login/signup) that:
Actually works - Users can easily create accounts and log in
Is secure - Hackers can't break in or steal data
Follows best practices - Industry-standard security
Is user-friendly - Clear messages, no confusion
Prerequisites
You should know:
Basic programming (variables, functions, if/else)
How to use Replit to create a project
Basic understanding of how websites work
You DON'T need to know:
Advanced security concepts
Complex cryptography
Database administration (Replit handles most of it)
Understanding Authentication Basics
What is Authentication?
Authentication = Proving you are who you say you are
Think of it like:
Showing ID to enter a club (you prove it's really you)
Using a key to unlock your house (only you have the key)
Entering a password to unlock your phone (verification)
The Three Parts of Authentication
1. REGISTRATION (Creating an Account)
User provides: Name, Email, Password
System creates: Account in database
System sends: Verification email
Result: User has an account (but can't login yet)
2. VERIFICATION (Confirming Email)
User clicks: Link in verification email
System checks: Is link valid? Not expired?
Result: Account is verified, user can now login
3. LOGIN (Accessing the App)
User provides: Email and Password
System checks: Do these match what's in database?
Result: User gets access to their account
Why All Three Parts Matter
Without Registration: No accounts = no app
Without Verification: Fake accounts and spam everywhere
Without Login: Anyone can access anyone's account
Registration System
What Information to Collect
MUST COLLECT:
First Name - so you know what to call them
Last Name - for full name identification
Email Address - considered a unique identifier (username)
Password - their secret key to login
SHOULD NOT COLLECT (unless needed):
Phone number - only if you actually need it
Address - only for shipping/billing
Birth date - only if age verification needed
Social security number - never, unless you're finance or govt.
Why less is better:
Less data to protect = less liability
Faster signup = more users complete it
Privacy-friendly = builds trust
Password Requirements Explained
Minimum 12 Characters - Why?
Short passwords are easy to guess
12+ characters = trillions of possible combinations
Makes brute force attacks nearly impossible
Modern best practice (traditional standard is 8, but that's increasingly considered weak)
Password Strength Examples:
Weak: "password123" - Common word + numbers
Okay: "MyPassword123" - Better but still predictable
Strong: "MyP@ssw0rd#2024" - Mixed types, harder to guess
Stronger: "Tr3e$H0use!B1ue" - Even better!
Character types needed:
Uppercase letters (A-Z)
Lowercase letters (a-z)
Numbers (0-9)
Special characters (!@#$%^&*)
Password Strength Indicator
Show users in real-time how strong their password is:
User types: "pass"
Show: WEAK - Too short
User types: "password"
Show: WEAK - Add numbers and special characters
User types: "Password123"
Show: MEDIUM - Add special characters
User types: "P@ssword123"
Show: STRONG - Good to go!
Why this helps:
Users understand what's needed
No frustrating "Password rejected" after submitting
Encourages stronger passwords
Better user experience
Email Verification - Why It's Required
Without email verification:
User enters: fake@notreal.com
Creates account with fake email
You can never contact them
They might be a bot or spammer
With email verification:
User enters: real@email.com
We send verification link
User clicks link to confirm
Now we know email is real
We can contact them if needed
Verification Link Rules:
Expires in 24 hours - Security (old links don't work forever)
One-time use - Can't be reused (prevents sharing)
Unique per user - Can't be guessed
Random token - Cryptographically secure
Example Registration Flow
STEP 1: User fills form
First Name: John
Last Name: Smith
Email: john@email.com
Password: ************
[Create Account Button]
STEP 2: System validates
✓ Is email format valid?
✓ Does password meet requirements?
✓ Is email already registered?
✓ All fields filled out?
STEP 3: System creates account
Hash the password (never store plain text!)
Create database record
Generate unique verification token
Send verification email
STEP 4: User checks email
Welcome to Our App!
Click to verify:
[Verify Email]
Link expires in 24 hrs
STEP 5: User clicks link
System checks: Is token valid?
System checks: Is it expired?
If yes: Mark account as verified
Show: "Email verified! You can now login"
STEP 6: User can login
Now the account is active and ready!
Cleaning Up Unverified Accounts
The Problem:
Day 1: User creates account but never verifies
Day 2: Still no verification
Day 3: Still no verification
... (account just sits there forever taking up space)
The Solution:
Automatic cleanup after 48 hours:
Background job runs daily
Finds accounts created >48 hours ago
Finds accounts still not verified
Deletes them automatically
Frees up database space
Why 48 hours?
Gives users plenty of time (2 full days)
Removes abandoned registrations
Reduces database clutter
Prevents fake account buildup
The Login System
Simple Login - Email and Password Only
Email: john@email.com
Password: *************
[Login Button]
Remember me
Forgot password?
Why not username?
Emails are unique (can't duplicate)
Users already know their email
No "what was my username?" confusion
Industry standard practice
Password Field Best Practices
ALWAYS hide password by default:
Wrong: Password: MyPassword123 (Anyone can see it!)
Right: Password: ************* (Hidden from view)
Include show/hide toggle:
Password: ************* (Click eye to show/hide)
Why?
Protects from shoulder surfing (someone looking over shoulder)
Still lets users check if they typed correctly
Best of both worlds
Account Lockout - Your Shield Against Hackers
The Attack (Brute Force):
Hacker tries:
password
password123
Password123
P@ssword
tries thousands of passwords
Without lockout:
Hacker keeps trying forever
Eventually might guess correctly
Gets into the account
With lockout after 20 attempts:
Hacker tries 20 times
Account locks automatically
Can't try anymore
Account is protected!
Lockout Details:
When: After 20 consecutive failed login attempts
Duration: 24 hours OR until admin unlocks
User notification: Email sent immediately
Reset: Counter resets to 0 after successful login
Important: The counter tracks failed attempts PER ACCOUNT, not per IP address. This prevents an attacker from bypassing the lockout by changing their IP address.
Rate Limiting - Slowing Down Attackers
Without rate limiting:
Attacker tries 1000 passwords per second
1000 attempts × 60 seconds = 60,000 attempts per minute
Can try millions of passwords quickly
With rate limiting:
After 3 failed attempts: Wait 1 second
After 5 failed attempts: Wait 5 seconds
After 10 failed attempts: Wait 30 seconds
After 15 failed attempts: Wait 2 minutes
Massively slows down the attack!
Exponential backoff = waiting time grows:
Attempt 1: Instant
Attempt 2: Instant
Attempt 3: Wait 1 second
Attempt 4: Wait 2 seconds
Attempt 5: Wait 4 seconds
Attempt 6: Wait 8 seconds
...doubles up each time
Session Management - Staying Logged In Safely
What is a session?
When you login, system creates a "session"
Session = temporary permission to be logged in
Session has an ID (like a temporary password)
Session stored in secure cookie
Session timeout - Why it matters:
Scenario: You login at library computer, walk away, forget to logout
Without timeout:
You're logged in forever
Next person uses computer
They access your account!
With 30-minute timeout:
After 30 minutes of no activity
System logs you out automatically
Your account is safe!
Timeout durations:
Customers: 30 minutes (balance of convenience and security)
Admins: 15 minutes (more sensitive, shorter timeout)
"Remember Me" option:
☑️ Remember me for 30 days
What this does:
Keeps you logged in for 30 days
Even after closing browser
Skip login on your personal devices
Still requires password if session expires
When to use "Remember Me":
Your personal computer
Your phone
Public computers
Shared devices
Work computers (if personal account)
Password Management
Password Hashing - The #1 Rule
NEVER STORE PASSWORDS IN PLAIN TEXT!
ABSOLUTELY WRONG (NEVER DO THIS):
Database:
┌──────┬───────────────┬──────────────┐
│ User │ Email         │ Password     │
├──────┼───────────────┼──────────────┤
│ 1    │ john@mail.com │ MyPass123!   │
│ 2    │ jane@mail.com │ Secret456#   │
└──────┴───────────────┴──────────────┘
If database is hacked → All passwords stolen!
RIGHT (ALWAYS DO THIS):
Database:
┌──────┬───────────────┬────────────────────────────┐
│ User │ Email         │ Password Hash              │
├──────┼───────────────┼────────────────────────────┤
│ 1    │ john@mail.com │ $2b$10$N9qo8uL...          │
│ 2    │ jane@mail.com │ $2b$10$8xKzQ2...           │
└──────┴───────────────┴────────────────────────────┘

If database is hacked → Passwords are gibberish!
Hacker can't reverse the hash to get real password!!!
What is Hashing?
Hashing = One-way encryption
Password: "MyPass123!"
   ↓ (hash with bcrypt)
Hash: "$2b$10$N9qo8uLTnmicShA..."
   ↓ (IMPOSSIBLE to reverse!)
   ✗ Can't get back to "MyPass123!"
How login works with hashing:
Login attempt:
User enters: "MyPass123!"
System hashes input: $2b$10$N9qo8uLTnmi...
System compares to stored hash
If they match → Password correct!
If they don't match → Password wrong!
Use bcrypt or Argon2:
These are trusted hashing algorithms
Specifically designed for passwords
Include "salt" (random data) to prevent attacks
Industry Standard
Example Code Concept
When user registers:
plainPassword = "MyPass123!"
hashedPassword = bcrypt.hash(plainPassword)
save hashedPassword to the database

When user logs in:
inputPassword = "MyPass123!"
storedHash = fetch from database
if bcrypt.compare(inputPassword, storedHash):
    login successful!
else:
    login failed.
Password Reset - The Secure Way
User clicks "Forgot Password":
STEP 1: User enters email
Enter your email: john@email.com
[Send Reset Link]
STEP 2: System generates token
Create random secure token (e.g., "7x9K2mP...")
Save token in database with:
* User ID
* Expiration time (24 hours from now)
* Status: unused
Send email with reset link
STEP 3: Email sent
Password Reset Request
Click to reset: [Reset Password]
Link expires in 24 hrs
STEP 4: User clicks link
System checks: Is token valid?
System checks: Is it expired?
System checks: Was it already used?
If all okay: Show new password form
STEP 5: User sets new password
New Password:
*************
Confirm Password:
*************
[Set New Password button]
STEP 6: System saves new password
Hash the new password
Save hash to database
Mark token as "used"
Send confirmation email
User can now login!
Security features:
24-hour expiration - Old links stop working
One-time use - Can't use same link twice
Random token - Impossible to guess
Rate limiting - After 8 attempts, delay 5 minutes
Email notification - User knows about reset request
Why rate limiting on reset?
Attacker spam-requests resets for victim's email:
1st-8th request: Immediate
9th request: WAIT 5 MINUTES
10th request: WAIT 5 MINUTES
This prevents:
Inbox flooding
Denial of service
Harassment
Password History - Prevent Reuse
The problem:
User's password leaked in data breach
Hacker knows password is "MyPass123!"
Without password history:
User resets to "NewPass456"
Later changes back to "MyPass123!"
Hacker still has valid password!
With password history:
User tries to change to "MyPass123!"
System: "You've used this before"
User must choose different password
How it works:
System stores hashes of last 5 passwords:
$2b$10$N9qo8uL... (current)
$2b$10$K7mP3sT... (previous)
$2b$10$R4xY9wQ... (2 passwords ago)
$2b$10$L1nB5vF... (3 passwords ago)
$2b$10$M8pT2rD... (4 passwords ago)
When user changes password:
System checks new password against all 5
If match found: Reject change
If no match: Accept new password
Add new hash to history
Remove oldest hash
Why 5 passwords?
Balances security and usability
Prevents immediate reuse
Not too restrictive - users can still find a new password
Industry standard
This is Part 1 of the guide. The complete guide continues with:
Admin Security
Error Messages Done Right
Email Integration
Database Security
Common Pitfalls
Testing Your Security
Troubleshooting Guide
Key Takeaways So Far
You've learned:
Why security matters for your app's success
The three parts of authentication (registration, verification, login)
How to collect the right information from users
Why password requirements protect your users
How email verification prevents fake accounts
Why account lockout stops brute force attacks
The critical importance of password hashing
How to implement secure password reset
Next up: Admin security, error messages, email integration, and more!
This is for: Non-HIPAA Customer-Facing Applications
About this guide: This is a comprehensive security guide specifically designed for young engineers and vibe coders building authentication systems in Replit. It explains not just what to do, but why each security feature matters.